How to Create a Simple and Beautiful Reverse Canvas
A Reverse canvas is a beautiful, beginner friendly project. These make great gifts or are a great addition in your home or office.
Recently, I got a Cricut Maker. The first thing I did was to create a photo from an SVG of my dogs and turned it into a beautiful reverse canvas project.
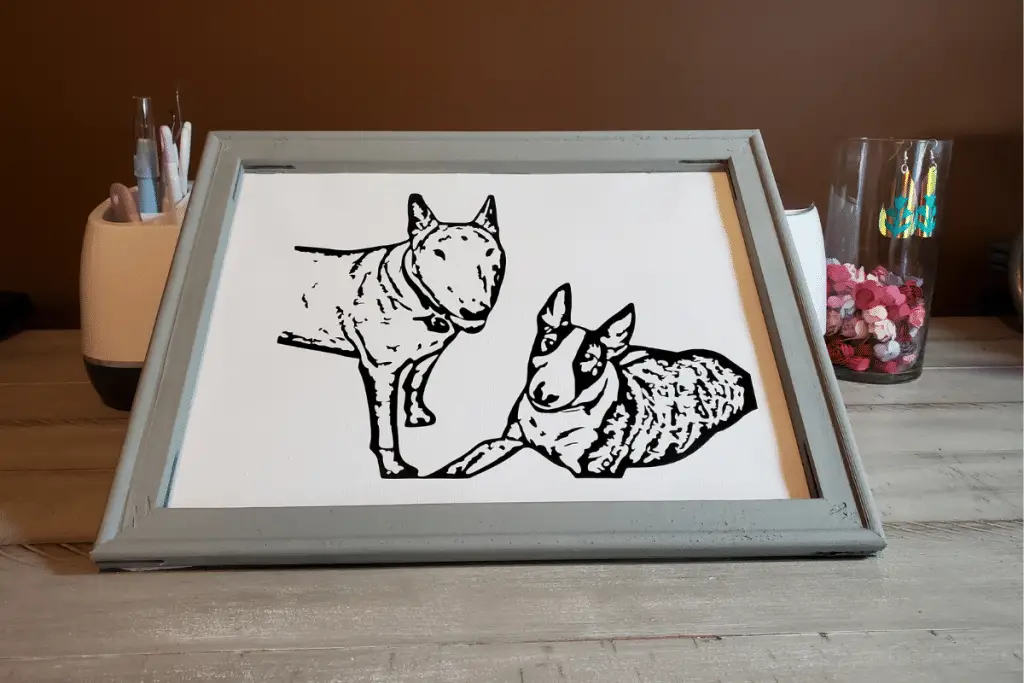
After creating the SVG, I was trying to find the perfect project. During this time, we sadly lost one of our dogs (Annabelle, on the right). Our dogs are Bull Terriers, and they are sisters. Losing a dog is losing a piece of your family. In creating this reverse canvas project with my Cricut, it was also a little therapeutic as I mourn the loss of our sweet Annabelle. I settled on a simple reverse canvas project and I’m really happy with how it turned out! This is very simple to make, I’ll outline the steps below and include links to the materials I used!
Items I Used:
- Canvas
- Staple remover
- Paint and paint brushes
- Knife/Scissors
- Hot glue and gun
- Heat Transfer Vinyl (HTV) and iron
- SVG
- Cutting Machine (I use a Cricut)
Preparing the frame
- Flip the frame over to where the canvas is stapled to the canvas. Remove all the staples. Now your canvas is separate from the frame.
- Take the frame and paint it. Two coats a paint seems to be the way to go!
Creating the vinyl for your reverse canvas:
- The first step is to create the SVG following the steps here: https://handcraftedhomegrown.com/photo-to-svg/
- Next you need to determine how big you want the image to be on your canvas, in this case, 12 x 9. This will be a smaller size than the measurements on the canvas you bought. Don’t be afraid to get out a tape measurer and take some measurements! I created a box that size so I can resize my dog SVG to the proper size to fit the canvas. Then, once you’re ready to print the project, you can delete the square (see picture below)
- Next, I welded the image together after deleting the square. You do this by selecting all and choosing weld.
- Make sure you pay attention to the instructions of your HTV and which side is the cut side! I used a green mat, HTV vinyl setting and extra pressure. I have found the extra pressure is a must to make weeding go smoothly.
- Be sure to mirror your image!
- Cut and weed!
- The end result will be your vinyl still on the protective plastic sheet,

Creating the Canvas
- Be sure to consult the instructions of your specific HTV
- First I lay the canvas down directly onto my kitchen table based upon the directions that came with my HTV
- Next I lay the weeded vinyl onto the canvas. I cover with a silicon sheet that came with my HTV vinyl
- I start my iron on a lower setting, since I don’t have a heat press, and you can also get warmer. But if you start too hot, you can’t undo it! I press firmly and move across the image slowly and purposefully. After 15-20 seconds, I lift a corner of the plastic sheet up to see if the vinyl is now attached to the canvas. Once the image is firmly on the canvas, you can remove the plastic sheet and let cool
Final Assembly of the Reverse Canvas
- The last step is hot gluing the canvas back onto the canvas. I start by putting hot glue along the back side of the frame along one of the shorter ends.
- Firmly place that part of the frame to the canvas.
- Once that is set, flip over the project and add hot glue half way down the two long sides press firm to the canvas
- Continue adding glue to the frame until the canvas is glued to the frame
- You will need to trim off the excess canvas, I use an exacto knife and it works very nicely! Do this safely. I set the canvas on the table in front of me and make sure to always be cutting away from my body.
- Enjoy!
If you decide to make one of these, I would love to see it! Find me on Facebook or Pinterest! Happy Crafting!
Love this!!!! Beautiful website and easy to maneuver around!!!!