What Brand of Window Cling is Best for Cricut
I tried my hand at making some Cricut window clings. I tried a few brands to find out which brand of window cling is best for Cricut.
For an intricate design, I recommend the Cricut brand of window cling – if you have the patience! Overall, I’d recommend a basic design and the VLMA brand window cling. However, the KESPEN brand was a close second and would work just fine if you’re looking for a solid color.
I put full reviews and what cut settings I used for each brand in detail below.
This site is a participant in the Amazon Associates program, as well as other affiliate programs. As an Amazon Associate, I earn from qualifying purchases. This post may contain some affiliate links for your convenience.
What is Window Cling?
Window cling is plastic that uses static electricity to cling to a window instead of an adhesive. Window clings are a great option if you’re applying something to a window that you don’t want to be permanent. They come off quickly and leave behind no residue.
Window cling does not use an adhesive or glue to stick, which is often why people choose to use it over vinyl. However, I find that it is a little bit trickier to use than vinyl, and while it works great for simple designs – it is not the best for more intricate designs.
Window Cling I Used
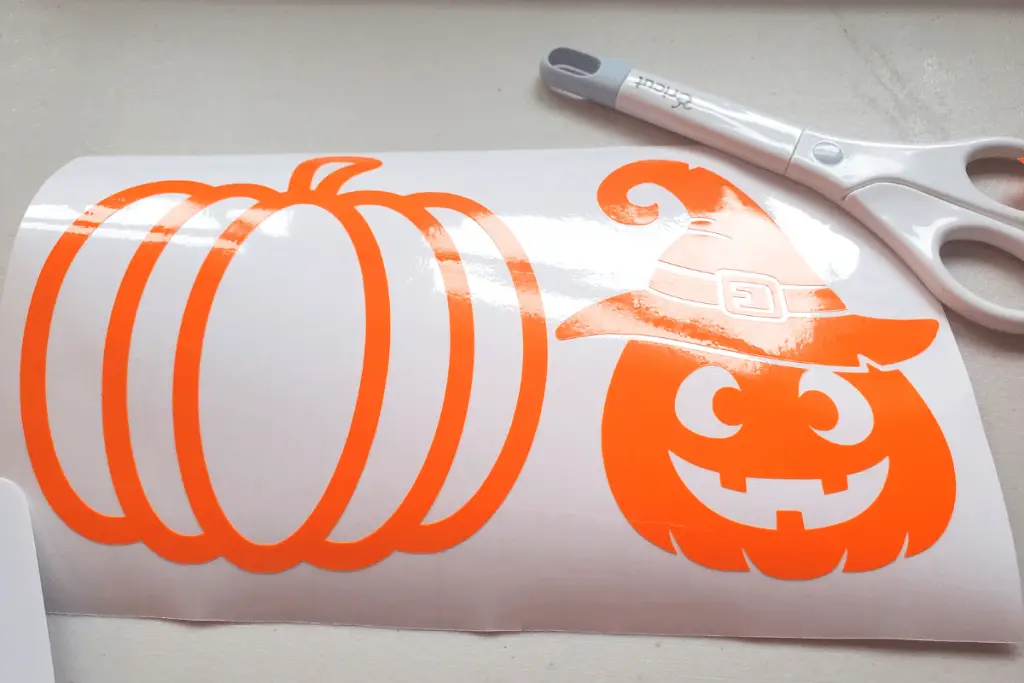
- Cricut Brand (orange) – See on Cricut here.
- VLMA Brand (multi-color) – See on Amazon here.
- KESPEN Brand (green) – See on Amazon here.
Overall Tips and Tricks With Working with Window Cling
Here are a few things I learned:
- The Cricut brand is the thinnest one I purchased, and was easy to work with generally. However, Cricut has a limited selection of colors in their window cling which means you’ll need to branch out to other brands for more options.
- The other two brands I chose were window privacy window cling that they sell by the roll to cover large areas
- Sticking with simple images works best across the board
- The more cut-outs within the window cling can make it less effective in sticking
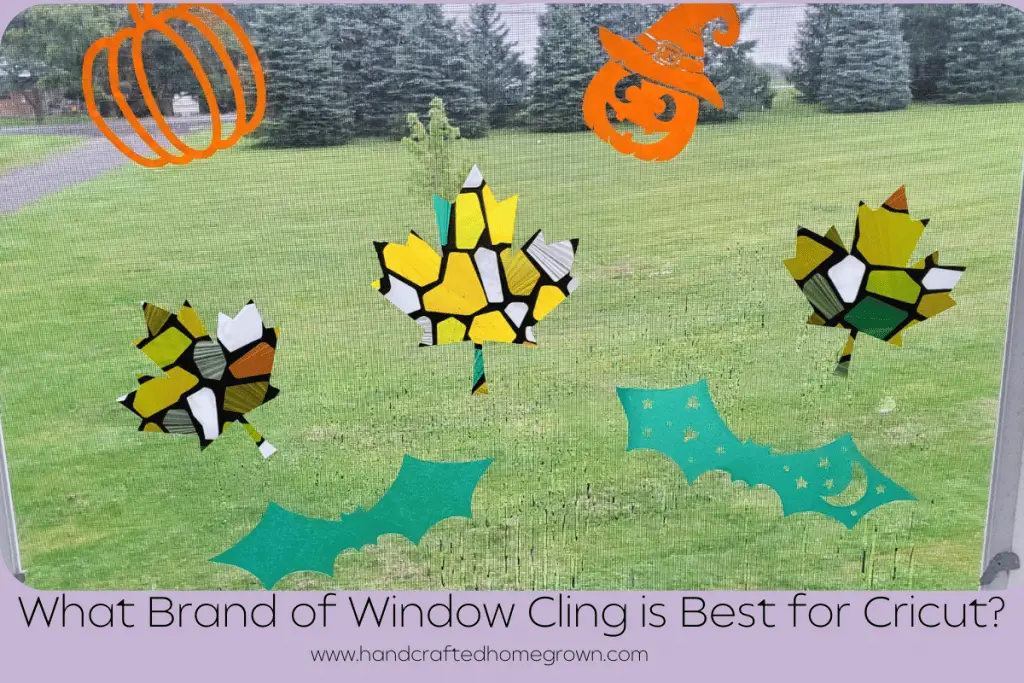
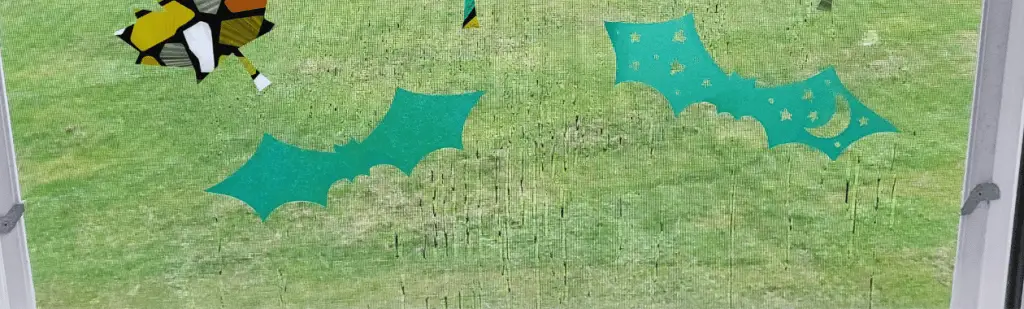
- For example, I have two bats in the green KESPEN cling. The one with the cut-outs, while adorable, does not stick as effectively as the solid one.
- Finding the right cutting settings can be tricky. Like any other material, I recommend small test cuts to narrow down the settings before trying anything too large. Don’t forget you can cut a design more than once by pressing the Cricut button after the cut is complete instead of unloading your mat.
- Each window cling will come with its own instructions on the best method to get it to static cling to the window. So be sure to read the instructions for the one you bought
Cricut Brand Window Cling Review
This is the orange cling in the photos.
Of course, when trying window cling with my Cricut, I first started with the Cricut brand. It is not available on Amazon (which is my go-to) so I had to buy directly from Cricut which was fine. However, there were not a lot of color options. So you need to order through Cricut. At the time I ordered my window cling, they had orange and black. This worked well for me as it was the end of the summer and we were moving towards fall/Halloween time. However, overall, I was pretty disappointed with the options available to me.
When you cut Cricut brand window cling, it’s very similar to cutting vinyl. You want to do a “kiss cut” where you cut through the cling but not the paper backing. If you’re doing an intricate design, they say to mirror the image and then use the backing paper to apply – which I did.
Cricut Brand Window Cling Settings and Application
- Mirror your image
- Used a standard green mat – that happened to be brand new
- I used the Cricut Window Cling material with extra pressure. I also cut it twice because my blade is not new and I wanted to be sure to get a clean cut. To cut it twice on the Cricut Maker, after the first cut is complete – press the Cricut button again instead of the arrows to eject your mat.
- Weed out the negative space, leaving only the window cling you want to transfer (just like you would vinyl)
- Clean the window and make sure it is dry before applying the window cling
- Take the window cling while it is still attached to the paper backing and press it to the window (cling on the window). Use the scrapper tool to help apply to the window.
- I will not lie to you, I did not find this super simple. But, I don’t have a ton of patience (I have two little kids, and depending on the day – all of my patience has been used up by 9 am, haha). However, taking it slow I was able to get there. It only took a few minutes to get it applied. But if the kids peel off any of the little pieces of the pumpkin, I’m not sure I’m getting it back on the window in the right spot
- It is my opinion that this is the best option for an intricate design
Check out this cute Halloween decoration I made using small canvases from Dollar Tree! How to Make Simple Cricut Halloween Project
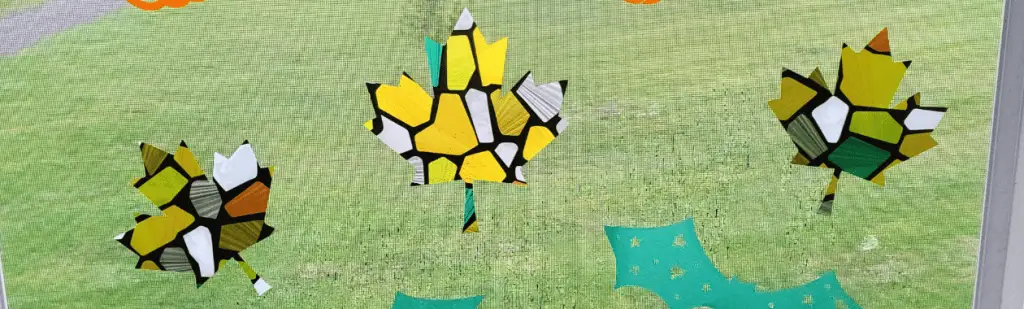
VLMA Brand Stained Glass Window Cling Review
This is the multi-colored cling in the photos.
I chose this brand of window cling because I liked the pattern on it and thought it would look good as fall leaves. It was also fairly inexpensive and comes with 6 feet on the roll. So you can get a lot of fall leaves out of this roll! I had a great experience with this vinyl and what I really liked was that when I went to apply it to the window, I just slapped it on there with no effort and it stuck with ease!
VLMA Brand Window Cling Settings and Application
I tried and failed a few times to get the cutting settings to work for me on my Cricut Maker. But once I got it, it worked well. The moral of the story is don’t be afraid to try a few things and fail until you get the settings just right.
- I was using a brand new green standard mat in my Cricut Maker
- When you open this window cling, there will be two sides, one that has ridges and a smooth side. The smooth side is actually a plastic protective sheet, just like heat transfer vinyl. I tried cutting first with the protective sheet on the mat and the ridges up, but my machine did not like that. Ultimately, I removed the protective film and put the window cling ridge side down so the blade is cutting through the smooth side.
- For best results, I used the window cling setting and cut through the cling 3 times. This is thicker plastic than I was expecting, much thicker than the Cricut brand. To cut through 3 times, when the first cut is complete, instead of removing the mat, press the Cricut button again. And do it one more time after the second cut. By not removing the mat, the machine cuts in the exact same place. If you remove the mat, it will not be precise.
- I was successful with only cutting through twice, after I removed the cling from the mat, I was able to gently pull the leaf design apart from the background.
- I cleaned off all the handprints and dog nose marks from my window using Windex and let it try for just a few minutes
- Then I placed the window clings against the window and it went on very easily with no fuss! This may be because the window wasn’t completely dry from the Windex. So you may need to spray it with water to get it to stick like the instructions.
- I do not think this would work great with an intricate design. I think it would be too hard to weed and apply. However, I love this design with the leaf pattern.
- After making a few window clings, in general, I would not recommend too intricate of designs no matter what brand you choose. But if you’re trying to do an intricate design – Cricut vinyl is probably the best choice due to the thinness and the fact it can be applied using the backing paper it comes on.
KESPEN Brand Window Cling Review
This is the green cling in the photos.
When looking for solid color options, I came across the KESPEN brand. I liked this brand because it had many different options in terms of color and roll size. Again, this is over 6 feet of material for a low price.
KESPEN Brand Window Cling Settings and Application
- I was using a brand new green standard mat in my Cricut Maker
- When you open this window cling, there will be two sides, one that has a slight texture and a smooth side. The smooth side is actually a plastic protective sheet, just like heat transfer vinyl. I tried cutting first with the protective sheet on the mat and the textured side up, but my machine did not like that. Ultimately, I removed the protective film and put the window cling texture side down so the blade is cutting through the smooth side.
- For best results, I used the window cling setting and cut through the cling 3 times. This is thicker plastic than I was expecting, much thicker than the Cricut brand. To cut through 3 times, when the first cut is complete, instead of removing the mat, press the Cricut button again. And do it one more time after the second cut. By not removing the mat, the machine cuts in the exact same place. If you remove the mat, it will not be precise.
- I was successful with only cutting through twice, after I removed the cling from the mat, I was able to gently pull the bat design apart from the background. But could not get any of the interior cuts out
- I also tried using the plastic sheet setting with extra pressure. That worked but did cut through to the mat. Next time I would try it without the extra pressure.
- I cleaned off all the handprints and dog nose marks from my window using Windex and let it try for just a few minutes
- Then I sprayed the window with water and the clings stuck right to the window.
- I do not think this would work great with an intricate design. I think it would be too hard to weed and apply. The bat with the cutout in its wings did not on the window for very long. I believe it inhibited the static cling necessary to stay stuck to the window. However, the solid bat stayed with no issue!
- After making a few window clings, in general, I would not recommend too intricate of designs no matter what brand you choose. But if you’re trying to do an intricate design – Cricut vinyl is probably the best choice due to the thinness and the fact it can be applied using the backing paper it comes on.
Wrap Up
If you liked this post, it would mean a lot if you would follow me on Facebook, Pinterest, or Instagram. If you use #handcraftedhomegrown on Instagram, I’ll be watching! 🙂
It would really help me if you pinned this post on Pinterest! Thank you!